
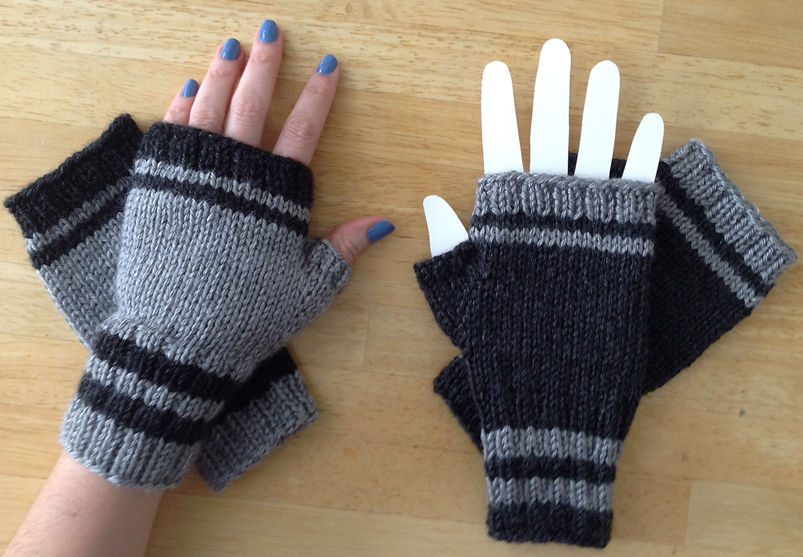
Midtown Mitts: Free Knit Pattern
- Amy

- Jul 7, 2021
- 6 min read
I have to admit: I was dubious about fingerless mitts for the longest time. I made them for craft markets because they were popular, but I was mystified by the idea of not covering the fingers. As a very cold person living in New England, I know that my fingers are the coldest part of me! Then my best friend got me a pair on her trip to the UK, handmade with gorgeous Irish wool. Now they (and two other pairs I have subsequently knit for myself) are part of my must-have outdoor autumn ensemble!
Here is my go-to quick and easy fingerless mitt recipe, written up as a cohesive pattern. The first pattern is for striped gloves, but I've included a simpler one-color version of the pattern at the end without color change notations.
Materials:
Size US #4 (3.5mm) dpn for ribbing
Size US #6 (4 mm) dpn for main section
Worsted weight yarn (shown: Lion Brand Heartland and Red Heart Soft)
MC = main color
CC = contrast color for striping
Notions: 2 stitch markers, scrap yarn to hold thumb stitches, tapestry needle
Gauge: 10 st across and 14 vertical rows = 2” in stockinette stitch (measured from the palm of the mitt)
Size: Adult medium
Pattern Notes:
- When you switch colors in a ribbed section, always KNIT the first round of the new color before resuming the k2 p1 ribbed pattern on the next row. This makes a nice smooth color transition and gets rid of that annoying little color blip that shows up in the purl column. And it doesn’t affect the ribbed pattern!
- Jogless striping for the win! This makes the color transition look much smoother and gives your work a more polished look. If you are unfamiliar with this technique, here is a photo tutorial of the method I like to use: https://www.craftsy.com/knitting/article/knitting-jogless-stripes-in-the-round/
- Switching needle sizes? When I make mittens, I switch needle sizes for a better fit without altering the stitch count. In this pattern, I cast on and start with size 6 needles for better elasticity on the arms, use size 4 to create a more contoured fit for the remainder of the ribbed cuff/wrist, switch to size 6 at the start of the thumb gusset increases, and then use size 4 for the last four rows of ribbing at the knuckle end of the mitt. If you don’t feel like switching needles you could use a size 6 throughout, resulting in a slightly looser fit in the wrist and knuckles.
- Casting on three stitches in Round 42 (after removing thumb gusset stitches): I just use a tight backwards loop cast-on here. You may use whatever cast on technique you prefer. Don’t worry too much if you have “droopy” corners on your thumb hole; you can tighten them up when you pick up stitches to work the thumb at the end. When picking up stitches you can also knit through the back loop to twist the stitches at the corners of the thumb hole to tighten things up a bit.

Striped Mitts:
CUFF:
With US 6 dpn, cast on 36 with Main Color (MC) (Note: I prefer long-tail cast on for elasticity)
Join in the round and place a stitch marker at the beginning of the round
Round 1-4: (Main Color - MC) Work K2 P1 ribbing (4 rounds total in MC)
Round 5: (Contrast Color - CC) Using CC and switch to US 4 dpn, knit 1 row
Round 6-7: (CC) K2 P1 rib around (3 rounds total in CC)
Round 8: (MC) Switch to MC, knit around
Round 9: (MC) K2 P1 rib around (2 rounds total in MC)
Round 10: (CC) Switch to CC, knit around
Round 11-12: (CC) K2 P1 rib around (3 rounds total in CC) Cut CC yarn, leaving a tail to weave in
Round 13: (MC) Switch to MC, knit around
Round 14-18: (MC) K2 P1 rib around (6 rounds of MC… or work rib to desired length)
Round 19-25: (MC) Knit in stockinette stitch around for a total of 7 rounds
Round 26: (MC) Switch to size 6 dpn and…
Left mitt: Knit 3 stitches, place new stitch marker for thumb gusset, knit around
Right: Knit to 3 stitches before end of round, place marker, knit last three stitches
Start thumb gusset: Work between markers as follows
Round 27, 29, 31, 33, 35: (MC) Between gusset markers - slip first marker, K1, M1R, knit to 1 st before marker, M1L, K1, slip second marker. Knit all other stitches in round. (This will give you five increase rounds in all. There will be 13 st between your two markers after round 35.)
Round 28, 30, 32, 34: (MC) Knit all stitches
Round 36-38: Work 3 more rounds of stockinette stitch
Round 39: (MC)
Left mitt: Slip all 13 stitches between markers onto scrap yarn. Keep beginning of round marker in place, cast on three stitches, remove gusset marker, then knit around
Right: Knit to gusset marker. Remove gusset marker and slip the next 13 stitches onto scrap yarn. Cast on three stitches and slip beginning of round marker to right needle.
Round 40-45: (MC) Knit all stitches for a total of 6 rounds
Round 46-47: (CC) Switch to CC, knit around (2 rounds total in CC)
Round 48-49: (MC) Switch to MC, knit around (2 rounds total in MC)
Round 50: (CC) Switch to CC, knit around. Cut MC yarn, leaving a tail to weave in
Round 51-54: (CC) Switch to US 4 needles and work 4 rounds of K2 P1 ribbing
Bind off in rib pattern. I prefer to use basic bind-off with a size 6 needle.
Now to make the THUMB:
Slip the 13 live stitches from scrap yarn onto size 6 dpn needles - 7 st on first needle and 6 st on second. On a third needle, pick up 5 stitches from the top of the thumb gusset opening. I like to get the three cast on stitches plus two stitches from either side. (18 st total on thumb)
Thumb round 1: Using Main Color, knit the first 12 stitches (the ones from the scrap yarn), ssk the 13th st with the first of the picked-up stitches, knit next 3 st, k2tog using last picked-up stitch and the first stitch of this round. Place stitch marker. (Note: you may want to twist stitches in the two decreases in this round to eliminate gaps in the thumb joint.) (16 st)
Thumb round 2: Knit the first 11 stitches, ssk, K1, k2tog. (14 st)
Thumb round 3-6: K1 P1 ribbing around
Bind off thumb in 1x1 rib pattern.
Basic Single-Color Mitt Pattern:
Don’t feel like stripes? Here is the basic pattern without any color changes!
CUFF:
With US 6 dpn, cast on 36 with MC (Note: I prefer long-tail cast on for elasticity)
Join in the round and place a stitch marker at the beginning of the round
Round 1-4: Work K2 P1 ribbing
Round 5-18: Switch to US 4 dpn and work K2 P1 ribbing (or continue until desired cuff length is reached)
Round 19-25: Knit in stockinette stitch around for a total of 7 rounds
Round 26: Switch to size 6 dpn and knit 3 stitches, place new stitch marker for thumb gusset, knit around
Start thumb gusset: Work between markers as follows. All stitches in the hand section will be worked in stockinette until the last four rows.
Round 27, 29, 31, 33, 35: Between gusset markers - slip first marker, K1, M1R, knit to 1 st before marker, M1L, K1, slip second marker. Knit all other stitches in round. (This will give you five increase rounds in all. There will be 13 st between your two markers after round 35.)
Round 28, 30, 32, 34: Knit all stitches
Round 36-38: Work 3 more rounds of stockinette stitch
Round 39: Now we place the live thumb stitches on scrap yarn to hold for later. Slip all 13 stitches between markers onto scrap yarn. Keep beginning of round marker in place, cast on three stitches, remove gusset marker, then knit around
Round 40-50: Knit all stitches for a total of 11 rounds
Round 51-54: Switch to US 4 dpn. Work K2 P1 ribbing around
Bind off in rib pattern. I prefer to use basic bind-off with a size 6 needle
THUMB:
Follow instructions as written above in the striped pattern.

And that’s it! You got yourself some cozy fingerless mitts!
You can sell items that are hand-made using this pattern. If you do, please credit me with the pattern design by linking back to me on facebook, instagram, or ravelry. Please do not sell or redistribute this pattern in its original or edited form.
For more knit and crochet patterns, check out my Ravelry store:
Please visit my Facebook page: https://www.facebook.com/warmnfuzziesbyamy/
My Instagram: https://www.instagram.com/warm_n_fuzzies_byamy/
Or see what else I’m working on: http://www.ravelry.com/projects/PhoenixElement


Comments